[Contents] [Prev] [Next] [Index]
4
Connecting Your BeOS System to the Internet
The BeOS is an Internet-native operating system, based on the same networking standards and protocols as those that control the Internet. These include TCP/IP, the basic Internet networking standard, and standards for file sharing, remote access, the worldwide web, and electronic mail. By utilizing these standards, your BeOS system can communicate with any other system on the Internet, including other BeOS systems, Windows, Mac OS, Unix, and other Internet-capable systems.
The BeOS is not limited to only Internet-standard networking, however. Its networking framework is flexible and expandable, so that software developers can add networking capabilities for virtually any other system. For example, your BeOS system can print to Postscript-based printers on Ethernet networks using the AppleTalk protocols. Other networking standards will become available from independent software developers for the BeOS.
This networking chapter covers the following topics:
Introduction
This chapter discusses how to configure your BeOS system for Internet networking. The next chapter, "Using Internet Services," describes how to set up your BeOS system for file sharing, worldwide web access, receiving Internet electronic mail, Internet remote access, and setting up a worldwide web server. Connecting your BeOS system to the Internet consists of these five steps;
- Connect network hardware -- Connect the appropriate network hardware to your system. This includes network adapter cards, modems, and cables.
- Gather IP Address information -- Obtain Internet IP address information from your network administrator or Internet service provider (ISP), prior to configuring your BeOS system.
- Add network interfaces -- Use the Network preferences window to add network interfaces, which tell the BeOS about physical connections to the Internet.
- Configure Domain Name services -- Use the Network preferences window to configure domain name services, servers the BeOS uses to help you navigate the Internet.
- Save and restart networking -- Save the network configuration and reinitialize networking with the new settings.
In addition to describing how to set up your BeOS system for Internet networking, this chapter covers more advanced topics such as setting up a stand alone network, configuring for multiple network interfaces, special domain name service configurations, and how to install new network driver software.
Connecting to the Internet
The following sections step you through connecting your BeOS system to the Internet in considerable detail. Because this can be a complicated procedure, this chapter tries to provide all the information you'll need to connect successfully.
Connecting Network Hardware
The basic BeOS system supports a wide range of networking hardware. It supports network adapter cards for both PCI and ISA slot architectures that conform to the three largest networking hardware standards: the Novell NE-2000 card standard, the 3Com EtherLink II standard, or the DEC 21040/21041 standard. In addition, the BeOS supports PowerMacintosh on-board Ethernet hardware.
You can also connect to the Internet using a modem. The BeOS supports a wide selection of modems, connected to your system through one of your computer's serial ports.
For information on installing networking interface cards, transceivers, modems, and cables to your PowerMacintosh or BeBox system, see your PowerMacintosh-compatible hardware user's guide, BeBox hardware system user's guide, and the guides that came with your networking interface cards, modems, and cables. Once you have connected the proper hardware, return here to learn how to configure the BeOS software for your specific setup.
Gather IP Address Information
There are two basic concepts you need to know about when setting up any computer, including a BeOS system, for Internet access; the Internet IP Address, and the Internet Domain Name.
· Internet IP Address
An IP (Internet Protocol) address is a set of four numbers, each ranging from zero to 255, separated by periods (also known as dots, and so sometimes an IP address is known as a dot address). An example of an IP address is 192.168.0.67. This is the basic form of "street address" for the Internet. All connected computers, and the hardware that runs the Internet, understand IP addresses. No two computers connected to the Internet have the same IP address at the same time.
· Internet Domain Name
A domain name is a human-readable (or human-rememberable) version of the IP address. A domain name is a set of characters, separated by periods. An example is www.be.com, the domain name of the main Internet web server at Be, Inc.
To set up your BeOS system for the Internet, you need a set of Internet IP addresses to tell the BeOS your location on the Internet. You then use domain names like www.be.com or mail.server.com to locate web sites, check mail, and access other services on the Internet. The IP address configuration information differs slightly if you're connecting to the Internet via an Ethernet network, or via a modem and phone lines.
If you are connecting to the Internet via Ethernet you should contact your network administrator to get the information you need to configure your BeOS system. If you are connecting via modem and phone lines, you'll receive this basic information from your Internet Service Provider (ISP), or from your company's network administrator if you're connecting to a modem at your company.
Note: If you're using the BeOS on a PowerMacintosh, and your system is connected to the Internet using the Mac OS, you can get IP address information from the TCP/IP control panel in the Mac OS. See the "
Mac OS TCP/IP Configuration Information" section in this chapter for details.
Information you need to connect to the Internet includes the following:
This is all the information you need to configure your computer for connection via an Ethernet network. If you are connecting to the Internet via modem, you need a few additional pieces of information:
Once you have the information listed above, you're ready to set up your BeOS system for connecting to the Internet.
Adding Network Interfaces
Configuring BeOS networking is done through the Networking Preferences, found on your main hard disk in the Preferences folder (file://boot/preferences/Network). When you double-click the Network preferences icon, this window appears:
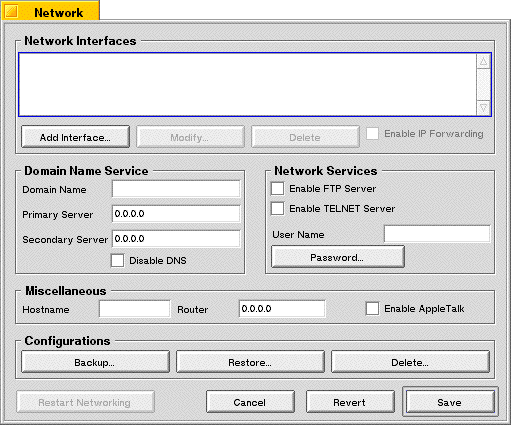
When you add a network interface to the Network preferences window, you're telling your BeOS system what physical paths it can use to get to the Internet. Your computer might be connected to the Internet by a direct Ethernet network cable, by a modem and phone lines, or both. A network interface is simply a description of these physical paths to the Internet. You must specify at least one network interface to successfully connect to the Internet.
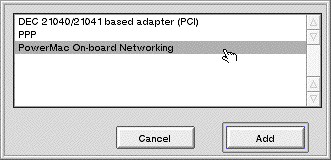
To add a network interface, click on the Add Interfaces... button in the Network preferences window. The following window appears:
Network Interfaces for Ethernet Connections
If you are using an Ethernet connection, you will likely use one of three types of network interfaces, depending on the specific network hardware in your computer system:
If your network adapter is not one of those listed above, you need to install a BeOS Network Driver before configuring the card. See "Installing Network Drivers" for more information on how to do this, and then return here to finish your network configuration. Once the network driver is installed, it appears in the Add Interfaces window.
Choose the proper network interface type from the list for your networking hardware, and press the Add button. The following window appears:

In this window, type the IP address and the net mask your network administrator provided to you, and press the Set button.
With an ISA-based Ethernet interface there is one additional step before pressing the Set button. PCI cards are self-configuring, but ISA cards are not. Press the Device Configuration... button, and the following window appears:
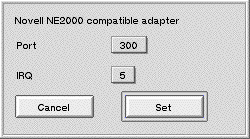
You can set the Port and IRQ (interrupt) numbers from the pop-up menus. The defaults are port 300 and IRQ 5, which work in most cases. For more information, see the guides that came with your computer system and your network interface card. Once finished, press the Set button. You return to the IP Address and Net Mask Window, where you can press Set to finish the Interface configuration.
Once you complete the IP address and net mask information, your Network Interface appears in the Network preferences window. You can now continue with configuring domain name services.
Network Interfaces for Modem Connections
If you are connecting to the Internet by modem, your computer uses the Point-to-Point Protocol (PPP) to complete your Internet connection via the phone line. You should therefore add a PPP Network Interface. Select PPP from the Add Interfaces window and press the Add button. You'll see the following window:
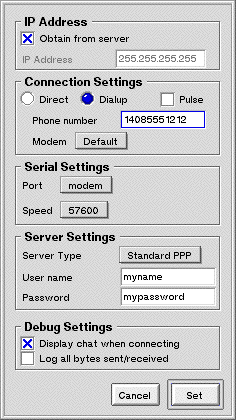
To configure your system for a modem-based connection, place the information provided by your network administrator or ISP in the appropriate fields of this window:
|
Setting
|
Description
|
|
IP Address
|
If you are using server addressing, check the Obtain from server checkbox. If you have an assigned IP address (manual addressing) for your computer, leave the checkbox unchecked, and type the IP address into IP Address field.
|
Connection
Settings
|
If you are connecting by phone line, click the Dialup radio button. Type the access phone number into the Phone number field, then select the type of modem you are using from the Modem pop-up menu. This selection tells the BeOS what type of controls to use for your modem. If your modem isn't in this list, check your user's guide for compatible modem types and choose one from the list.
Use the Direct radio button option only if you are connecting to another system via a null-modem cable. Generally this is only for specialized network configurations.
|
|
Serial Settings
|
Use the Port pop-up menu to select the serial port your modem is connected to. Then select the serial speed of your modem. This is the speed at which the modem and computer communicate, not the modem's speed. In general, select a setting that is higher than your modem's highest speed (i.e., select 57600 if you are using a 28800 or 33600 modem). If you are unsure, use the 57600 setting as a default.
|
|
Server Settings
|
From the Server Type pop-up menu, select the type of communications server you are connecting to (you should receive this information from your network administrator). The most common interface is Standard PPP; if you're unsure of the setting, use this one. The second most popular server is Unix Login. After selecting a server, type your user name and password in the appropriate fields.
|
|
Debug Settings
|
You or your network administrator can use these options to monitor the connection process in order to work through connection difficulties. Display chat when connecting display, the messages sent and received by your modem during the connection process. Log all bytes sent/received writes the messages to a file. In general, you should leave these options unchecked (off).
|
Once you have completed the PPP configuration window and pressed the Set button, your PPP Network Interface appears in the Network preferences window. You can now continue with configuring domain name services.
Configuring Domain Name Services
After you add the proper network interface, you return to the Network preferences window. Your newly added network interfaces appear in the window (with your computer's assigned IP address, or 0.0.0.0 if you are using server addressing).
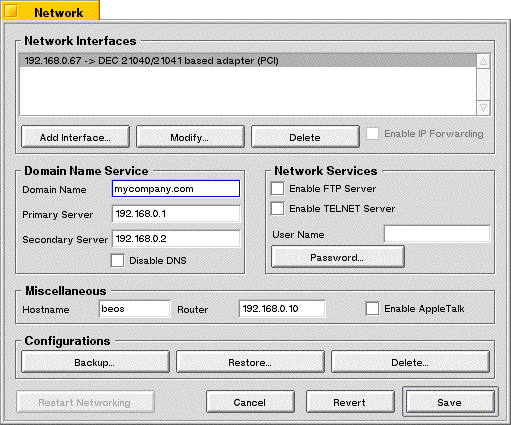
You should now enter your Domain Name, Primary Domain Name Server IP address, and Secondary Domain Name Server IP address in the Domain Name Service portion of the window. Then type in your computer's host name, and Internet Router IP address in the Miscellaneous section of the window. If you are unsure of the router IP address, use 0.0.0.0 as the default.
Note: The checkboxes and fields in the Network Services portion of the window are described in the chapter "
Using Internet Services." You can ignore these fields for now. The Enable AppleTalk checkbox is described in the chapter "Learning Be Application Basics." Disabling DNS and enabling IP forwarding are described in this chapter in the sections "Disabling Domain Name Service" and "IP Forwarding."
Saving and Restarting Networking
Once you add your domain name service configuration information to the Network preferences window, press the Save button. This writes your configuration information to disk. The following window appears:

Any time you change the BeOS Networking Preferences, you should restart networking. This allows the BeOS to disconnect from current network services, and reconnect using the new settings.
Note: Restarting networking interrupts currently running network operations, such as retrieving mail or downloading a web page. Make sure you don't have any open applications that actively use Internet services before you restart networking. Also, if for some reason an application or your Ethernet network causes BeOS networking to temporarily stop functioning, you can use the Network preferences window's Restart Networking button to reset networking.
Once you save the settings and restart networking, you may close the Network preferences window. Your BeOS system is now configured for accessing the Internet.
Backing Up and Restoring Network Configurations
Once you set up your BeOS system for Internet networking, you can name the networking configuration and save it. You can save multiple configurations using the Network Preference window, for example one for connecting to an ISP from home, and one for connecting to an office network. You can then restore a saved configuration in a few mouse clicks to quickly switch between Internet connections.
To save a configuration, configure networking options in the Network preferences window. Then press the Backup... button in the Configurations portion of the window. The following window appears:

Give the configuration a name, and press the Backup button. Your configuration will be saved to disk.
To restore a configuration, press the Restore... button in the Configurations portion of the Network preferences window. You will see the following window:
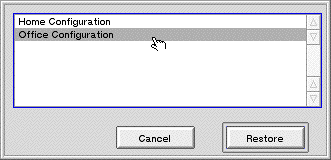
Select the configuration you wish to restore, and press the Restore button. The network preference settings are replaced with the restored configuration. Then press the Save button to save the network settings and restart networking for the new configuration to take effect.
If you want to permanently delete a saved network configuration, press the Delete... button in the Configurations portion of the Network preferences window. You will see the following window:
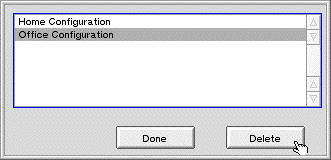
Select the configuration you want to delete, and press the Delete button. The selected configuration is removed from the list of saved configurations.
Initiating a PPP Connection
If you are using a modem to connect to the Internet, the BeOS automatically initiates a PPP connection whenever you access an Internet service, such as a web page or a file server. When this happens, a window appears on your screen that looks like this:
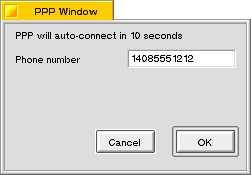
The PPP connection begins automatically in ten seconds. You can type an alternate phone number for the connection if needed. You can also press the OK button to begin the connection immediately.
Note: Pressing the Cancel button, or clicking the close box, cancels the PPP session initiation. Many applications, however, try multiple times to initiate the connection, so you may have to click cancel a few times before the application gives up.
Once the BeOS is connected to the Internet, the window changes to look like this:
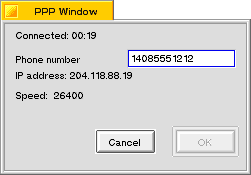
This window shows how long the PPP connection has been active, the IP address being used, and the actual speed of the modem connection. You can press the Cancel button, or click the close box, to terminate the PPP connection and disconnect the modem. The PPP connection automatically starts again if your BeOS system or an application needs to communicate with the Internet.
Setting Up a Stand Alone Network
There are situations in which you may want to connect your BeOS system to an Ethernet network that is not connected to the Internet. For example, if you have a home or office network which connects multiple BeOS systems, or a BeOS system with Windows, Mac OS or Unix-based systems, and want to transfer information between these systems. This type of network is called a stand alone network.
Since the BeOS is a native Internet networking system, it relies on the Internet's TCP/IP protocol to communicate over Ethernet, even if it is not connected to the Internet. But if you're creating a stand alone network, you don't have a network administrator to provide IP addresses and other information needed to configure networking. How do you configure networking in such a situation?
Fortunately, the creators of the Internet anticipated just such a situation, and set aside a class of IP addresses to use only for stand alone networks. These addresses all have the following configuration:
The xxx in the IP address can be replaced with any number from 1 to 254. This means that you can have up to 254 devices connected to a stand alone network
Note: You can't use 0 and 255 be used as the last number in the IP address, because Internet protocols reserve these numbers for specific network functions; using them may confuse some computer systems. You can use other IP addresses for a stand alone network, but if you later connect your stand alone network to the Internet (as in "
Setting Up BeOS for Both Stand Alone Network and Modem-Based Internet Use"below) you may have problems with conflicting IP addresses. It's best to use the reserved 192.168.0.xxx address format for local networks.
To set up your BeOS system for a stand alone network, use the following configuration information:
You can give other systems on your stand alone network other addresses in the 192.168.0.xxx range (remember, each device must have a unique number). To configure Windows, Mac OS or Unix systems for stand alone networks, refer to the user's guides that came with those systems.
Your stand alone network will not have a domain name server (unless your specifically configure one of the systems to provide such services). Because of this, you need to use the Internet IP Address, rather than a domain name, to communicate between computers on the stand alone network.
Setting Up BeOS for Both Stand Alone Network
and Modem-Based Internet Use
You may find yourself in a situation where you want to connect your BeOS system to a stand alone network, and at the same time be connected to the Internet via a modem. This is common in small businesses or home office situations where multiple systems are interconnected, and only the BeOS system has a modem connected. You will want to communicate with the local systems and with services on the Internet without disruption.
The BeOS can handle this situation smoothly. To set this up, do the following:
- Set up an Ethernet-based network interface for the stand alone network.
Add a network interface for the appropriate Ethernet connector as if you were setting up a stand alone network (see "Setting Up a Stand Alone Network"). Use an IP address of the form 192.168.0.xxx, and a net mask of 255.255.255.0. Other computers and devices on the stand alone network should be configured as described in "Setting Up a Stand Alone Network."
- Set up a PPP network interface for the modem-based Internet connection.
Use the IP address and net mask provided by your network administrator.
- Configure domain name services using the PPP information.
Set up the domain name service section using the domain name, primary and secondary domain name server IP addresses, and router IP address provided by your network administrator for the PPP connection.
- Save and restart networking.
Once you complete this configuration, your BeOS system will be active on both network interfaces. You can communicate with devices on your local network through the Ethernet interface. Whenever you attempt to access a service that is not on your stand alone network (www.be.com, for example), the BeOS initiates a PPP connection. While connected to the Internet via modem, you can still communicate with any device on your local network.
Multiple Network Interfaces
As described in the proceeding section, the BeOS can handle multiple network interfaces -- multiple network interface cards, multiple modems, or any combination. To enable this, use the Network preferences window to add one network interface for each type of physical connection.
There is only one rule to keep in mind. Each network interface must have a different IP address. You cannot assign the same IP address to multiple interfaces because the interface that information should be sent by and received from will be unclear. For this same reason, you are restricted to one PPP interface that uses server addressing (although you can have multiple PPP interfaces that use manual addressing).
IP Forwarding
Let's say you have a stand alone network with multiple computers connected, and you have a BeOS system with a network interface's connected to the Internet (via PPP/modem or a separate Ethernet network). Can the BeOS system forward information from the other systems to the Internet, and send information from the Internet back to them?
The answer is yes. To enable this function, check the Enable IP Forwarding check box in the Network preferences window. The other computer systems on your local network should have the IP address of your BeOS system as the router IP address in their TCP/IP configuration.
The BeOS then forwards Internet-bound information for the stand alone network. In a way, your BeOS system acts as a lightweight Internet router for your local network.
Note: IP forwarding requires a lot of processing time if there is heavy traffic coming from and going to the local network. Keep this in mind before using the BeOS system you're working with IP forwarding.
Note: The IP Forwarding checkbox will only be enabled once the BeOS is configured with more than one network interface.
Disabling Domain Name Service
When trying to resolve a domain name (convert a domain name into an IP address), the BeOS uses a specific set of steps in a specific order;
- It check the hosts file on the BeOS system for domain name information.
- If there is no hosts file entry, it checks the primary domain name server.
- If there is no response, or the domain name is unknown, it checks the secondary domain name server.
- If the domain name is still unknown, it posts a resolution failure error.
Note that the middle two steps require the BeOS to contact domain name servers. There are times when this is not desirable, because it causes an unwanted PPP connection or for some other reason. Checking the Disable DNS button in the Network preferences window turns domain name services off.
With DNS disabled, the BeOS only checks the local hosts file to resolve any domain names. This means that the only domain names that can be used are those specifically placed in the hosts file.
Note: Disabling DNS is not recommended if you are connected to the Internet. Most Internet services, notably worldwide web pages, require DNS services to operate correctly. Any reference of the type www.be.com will be unresolved and unreachable. Disabling DNS should only be used in stand alone networks, or in unusual network configurations.
Editing the hosts File
The hosts file, located in your Home configuration folder (file://boot/home/config/etc/hosts) is a text file that contains information needed to resolve domain names. By adding addresses to the hosts file, you can use domain names, rather than IP addresses, to connect to devices on a stand alone network, or devices that might be unknown to domain name servers on the Internet.
A standard BeOS system does not have a hosts file. However, there is a hosts sample file (file://boot/home/config/etc/hosts-sample) which can be duplicated and modified. Duplicate the hosts sample file and rename it hosts. You can then edit the hosts file to add the appropriate domain names and IP addresses.
The hosts sample file initially looks like this:
#
# Sample hosts file for assigning names to IP addresses.
# You do not need this file if you are using the Domain Name Service (DNS).
#
# Copy this file to /system/hosts and edit as necessary.
# The format is nearly identical to the Unix hosts file format.
#
# NB: do not put any leading tabs or spaces at the beginning of the line
#
# Format is:
#
# IP-address        hostname                   aliases (optional)
#
192.0.0.23        Unixbox.mycompany.com      Unixbox
192.0.0.123       bebox.mycompany.com        bebox
You can add new IP addresses and domain names to the bottom of this file (and you can remove the Unixbox and bebox lines). For more information on using this file, refer to the Be web site (http://www.be.com). You can also find information on this standard file in many Unix networking publications.
Installing Network Drivers
If your network adapter card is not one of those listed in the standard BeOS system installation, you need to install BeOS network driver files before configuring the card.
BeOS network driver files may have come in the same package as the network adapter card. You may also find information about new network drivers as they are created on Be's web site (http://www.be.com).
Network drivers are add-ons to the BeOS network server and the BeOS kernel. Because of this, they should be installed in your Home configuration folder, in the network server add-ons folder (file://boot/home/config/add-ons/net_server/) and the kernel add-ons folder (file://boot/home/config/add-ons/kernel/drivers/). If you look in BeOS add-ons folder (file://boot/beos/system/add-ons/net_server/), you'll find the following drivers already installed with the basic BeOS system:
Once you install new network drivers into the appropriate folders (or your installer software has done it for you,) they will appear in the Add Network Interface window, and you can continue with network configuration. For more information on installing drivers and add-ons, see the chapter "Customizing the BeOS."
Mac OS TCP/IP Configuration Information
If you are using a Power Macintosh or compatible, and have already connected your system to the Internet from the Mac OS, you can obtain the information you need to connect your BeOS system to the Internet without having to find your network administrator. To do this, open the TCP/IP control panel from within the Mac OS. You'll see the following window:

The IP address, net mask (subnet mask), router, primary and secondary domain name servers (name server address), and domain name (starting domain name) are all in this window. Copy the information on a slip of paper, and use it to configure your BeOS system.
Note: If you're using a PPP connection for Mac OS networking, the above window will look a bit different, but will still provide you with the information you need to configure your BeOS system. If you are using non-Apple provided PPP software, you may need to open another window to obtain phone number information. Consult your Mac OS networking guides for more information.
[Contents] [Prev] [Next] [Index]
http://www.be.com/
Copyright © 1997, Be, Incorporated. All rights
reserved.


