[Contents] [Prev] [Next] [Index]
3
Learning Be Application Basics
The BeOS comes with a number of applications. Some you use to create documents, some to configure your working preferences, and others to demonstrate the potential of the BeOS. Most applications are in the /apps folder located on your boot drive. You start applications, open files, type and edit text, save files, quit applications, and perform many other tasks the same way in most applications. This chapter introduces you to these basic techniques, and includes the following topics:
Starting an Application
You can start an application by double-clicking its icon. Other ways to start an application include selecting its icon and choosing Open from the File menu, and selecting an application icon and pressing Enter. You also start an application when you open a file -- if the application you use with the file isn't already running. When an application is running, its name is added to the application list -- located under the Be logo in the Deskbar.
Switching Applications
You can run many applications at the same time. The BeOS and the applications themselves understand how to share processors, memory, and other resources, so many applications can do many things simultaneously. While all running applications are "active," in the sense that they're all doing whatever you told them to do, only one application has a yellow title bar to indicate it is the active application. This is the application that responds to what you type on the keyboard, There are a number of ways to switch among applications. The simplest is to click in a window belonging to the application that you want to work in. Another way is to choose an application from the application list in the Deskbar.
Quitting an Application
When you finish working with an application, you can quit it by choosing its Quit command. In most applications the Quit command is in the File menu. In many applications, closing an application's windows also causes it to quit. It's a good idea to quit an application if you won't be using it for a while, to free up resources for applications you're still using.
Creating a New File
When you start many applications -- such as StyledEdit -- they open a blank, unnamed file in a window. You can work in this file and then save it (as described in "Saving a File" in the next section). You can create and open another new file by choosing the New command. The New command is in different locations in different applications, but in most it's in the File menu in the application's windows. It's important to save a new file as soon as you create work that you don't want to lose.
Saving a File
When you work in a file, your changes aren't stored permanently until you save them. If you experience a power outage, or if the application crashes, or if you accidentally press "Control-Alt-Delete," unsaved changes are lost. Saving a file puts a copy of the file with the latest changes on a disk, where it's stored permanently -- until you change the file and save it again.
If you make changes to a file that already has a name and location on a disk, save your changes by choosing the Save command. The Save command can be in different menus in different applications, but it's most often each application window's File menu.
Opening a File
There are many ways to open files. The simplest is to double-click a file's icon. You can also select a file's icon and choose Open from the File menu, or select the file and press Enter. Most files have an application they're associated with -- usually the application they were created with. When you double-click a file, it opens in this application. A file's icon usually resembles the icon of the application it's associated with, so you can tell what application a file will open in by looking at its icon.
If a file doesn't have an application associated with it, you're asked if you want to use StyledEdit to open the file when you double-click it. You can drag a file onto an application icon to open it in that application. This is a good way to open a file in an application it normally isn't associated with. For example, you can use this technique to open a script file you want to read or edit in the StyledEdit application -- if you just double-click a script file, the script runs, instead of opening in a document window. (Of course, the application has to know how to open the file, so you can't, for example, drag an ImageViewer file onto the PlaySound icon.)
Working With Text
You use the keyboard and mouse to create and edit text in many locations in the BeOS. You can edit file names, text files, settings in panels and dialogs, and so on. Edit text by selecting where you want to type and then typing. You can also copy text from one place and move it to another, or delete text.
The on-screen location where what you type (or text you move) will be entered is indicated in two ways. The first is by a blinking vertical bar, called the insertion point. The second is by highlighted text you want to replace.
Selecting Text
There are a number of ways to select text.
In many applications, you can choose the Select All command to select all the text in a window or document; the Select All command is usually in an application's Edit menu.
Typing Text
You type text in documents, when you name or rename files, in the Save panels, and in many other places. To type text, click to select an insertion point or select text you want to replace, then type what you want. If you select text, what you type replaces the selection.
Typing Special Characters
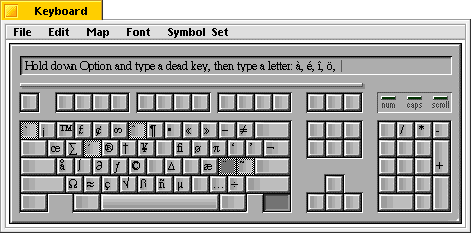
You type accented characters, symbols, and other special characters by holding down the Option key (the key labeled "Control" on the right side of most PC keyboards; the key labeled "Option" on Macintosh keyboards) while you type one or more other keys. You type most accented characters by typing a dead key with the accent you want, followed by the letter you want accented. Dead keys are keys that when pressed, don't place a character on the screen until you type another character. For example, to type "é," you press Option-E and then type "e."
In the Keymap application, dead keys are indicated by a checked border. The keymap is located in the Be Preferences folder. The Keymap application is a good tool to use to find the accents and other special characters you want.
For more information, see "Using the Keymap Application" in Chapter 6, "Customizing the BeOS."
Copying and Moving Text
To copy selected text and paste it elsewhere, select the text you want to copy and choose Copy from a window's Edit menu. Then select an insertion point or text you want to replace and choose Paste from the Edit menu. You can paste text in the same document you copied it from or in any other application where you work with text, including the names of items in windows and text fields in panels. To move text rather than copy it -- that is, remove the text you select and paste it elsewhere -- choose Cut from the Edit menu instead of Copy.
Text you cut or copy is stored in a special part of memory, called the "clipboard." What you last cut or copied remains on the clipboard until you cut or copy something else, so you can paste what you cut or copied repeatedly, without having to cut or copy the original again.
Moving Text With the Mouse
You can use the mouse button to move selected text by dragging it. When you this, the cursor changes shape to help you position the text exactly where you want it.
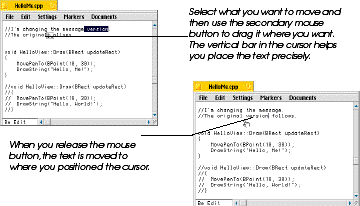
Initially, the right mouse button is the secondary mouse button on a three-button mouse, but you can change which button is the secondary mouse button with the Mouse preferences application (see "Setting Mouse Preferences" in Chapter 6, "Customizing the BeOS."
Deleting Text
The simplest way to delete text is to press the Delete key which erases the text to the left of the insertion point letter by letter. (Depending on the keyboard you're using, the Delete key may be labeled "Delete," "Backspace," or just have a left-pointing arrow.)You can delete selected text all at once by pressing the Delete key. Many applications also have a Delete command in their windows' Edit menus. The Delete command acts on selected text just like pressing the Delete key.
Printing With the BeOS
The BeOS currently ships with support for two types of printers:
Selecting a printer is a two-step process on the BeOS:
There are two applications in the preferences directory, called Add Printer and Select Printer, which perform these two operations.
Adding a Printer
To add a printer first launch the Add Printer application, located in the Preferences folder. You will see that the BeOS currently supports two types of printers: the Apple LaserWriter Compatible, HP PCL3 LaserJet Compatible. As developers add drivers to the system, other printers types will appear in this window.
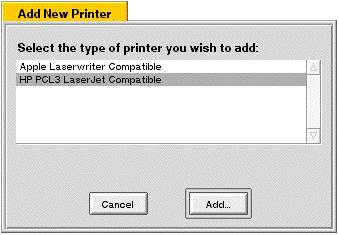
The HP LaserJet driver supports LaserJet-compatible (PCL3) printers connected via the parallel port to the BeBox. Because Power Macintosh-compatible computers do not have a parallel port, users should not try to add an HP LaserJet-compatible printer to their system.
Adding an HP LaserJet to Your System
To add an HP LaserJet printer to your system:
- Launch the Add Printer application.
- Select HP PCL3 LaserJet-compatible and click Add.
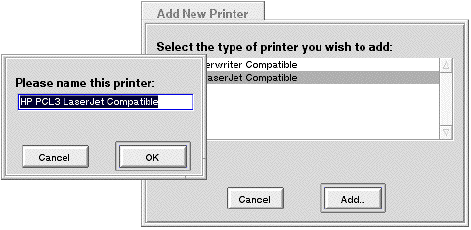
- A dialog appears that lets you type in a new name for the printer.
- When you click OK a dialog asks if you want this printer as your default printer. Click Yes if you do.
Adding an Apple LaserWriter-Compatible Printer
The BeOS Preview Release supports Apple LaserWriter-compatible printers that are connected via the Ethernet. Make sure that AppleTalk is turned on in the Network preferences panel before adding an Apple LaserWriter to the system.
If you have a LaserWriter-compatible printer connected via Ethernet that you want to print to:
- Launch the Add Printer application.
- Select LaserWriter Compatible and click Add.
- Select which LaserWriter-compatible printer to add to your system from the top list.

Note: You can see and select only the printers that are in the same AppleTalk zone as your computer.
- Select the description file for the selected printer.
- Choose a name for the printer on your system.
- Click OK.
- When you click OK a dialog asks if you want this printer as your default printer, or current, printer. Click Yes if you do.
Repeat these steps to add other printers to your selection.
Selecting a Printer
When you add new printers to your system, you can make any one the default. Use the Select Printer application when you have more than one printer on your system and want to switch between them:
- Launch Select Printer
- Select the printer you want to print to from the scrolling list available on your system and click Select.
Page Setup and Print Dialogs
Applications have two dialogs that control printing: Page Setup and Print.
The Page Setup Dialog controls the orientation, scale, and paper size of the document.
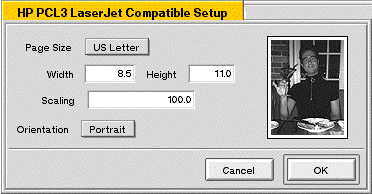
The Print dialog controls the number of copies, page range to print, and print quality.

The Page Setup and Print dialogs are slightly different when printing to a LaserWriter-compatible printer.
While the Print dialog is virtually identical, the Page Setup dialogs for LaserWriter compatible printers is somewhat different than for LaserJet compatibles.
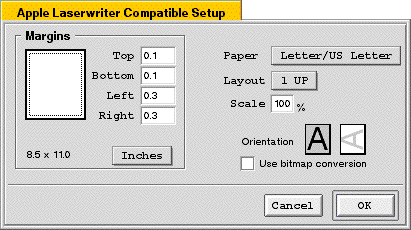
On the left side of the dialog you can set the margins for the page and choose the scale (inches, centimeters, or points). On the right side of the dialog:
[Contents] [Prev] [Next] [Index]
http://www.be.com/
Copyright © 1997, Be, Incorporated. All rights
reserved.


