Using FlyerHDTools
(c) 1997 Chuck Baker; adapted from "FlyerHDTools: Get Productive with an Inside Look",
(c) 1996 Chuck Baker, published in Video Toaster User Jan '97 issue.
One of the first programs that you will need to use from the Flyer's software suite is FlyerHDTools, which is used to prepare a hard drive to be used as a video or audio drive with the Flyer. The program is located in the NewTek/Programs directory (see icon, Figure 1). NewTek has included documentation files for the program in the directory NewTek/Programs/Documentation/Flyer.
The specific files are:
-FHDTeknotes.doc, which is a general document on selecting drives for the Flyer, and on technical issues in the practical use of drives with the Flyer;
-FlyerHDTools.doc, which is the document on how to use the program FlyerHDTools;
-HDToolsResults.doc, which is a sample file composed of several drive tests with comments.
Neither the drawer nor the files have icons, so you will need a directory utility to locate and read them. Many users find these doc files difficult wading, so in this article I will present a simple, step-by-step tutorial on how to run the program, and test and prepare a drive. This article assumes that you have already physically attached the drive to the Flyer.
"Put your toe in the water--"
With the drives and your computer powered up, and with no other software running (at all, whatsoever!), open your NewTek directory, enter the Programs directory, and double-click on the FlyerHDTools icon (Figure 1).

Figure 1. FlyerHDTools Icon.
The main FlyerHDTools (FHDT) panel will open, and your pointer will be "busy" for a while, as the program polls the Flyer SCSI buses for attached drives. Once FHDT has located all attached drives, it will list them in the Drive Information Window near the top of the main panel (see Figure 2).
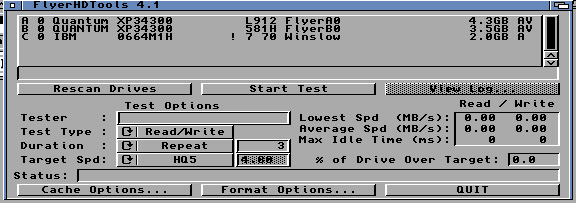
Figure 2. Drive Information Window at top of panel, listing three drives.
Note that right below the Drive Information Window is an empty text gadget. This gadget will display the information about the drive which has been selected for FHDT operations.
Move your pointer over one of the line listings in the drive
information window, and click the left mouse button. The line will highlight while the mouse button is pressed, and the information will then appear in the text gadget (see figure 3).

Figure 3. A drive is now selected for operations, in the center gadget.
What does this line of text mean? The information for the selected drive is:
A 0 Quantum XP34300 L912 FlyerA0 4.3GB AV
One thing this means is that I could not find a virgin Flyer drive at NewTek. If I had, the line would have read:
A 0 Quantum XP34300 L912 4.3GB NFS
The "NFS" may or may not be present, depending on the revision of FHDT, and would indicate "No File System" on the drive. Broken down item by item, this is what the line means:
A - This drive is on Flyer SCSI port A.
0 - This drive has a SCSI ID of 0.
Quantum - The drive's manufacturer
XP34300 - The drive's model number
L912 - The drive's firmware revision number. "Firmware" is the operating system on the drive.
FlyerA0 - If the drive has been formatted, the Workbench volume name will appear after the revision number.
4.3GB - If formatted, the formatted capacity of the drive; if the drive has never been formatted, the raw capacity of the drive.
AV - This drive has been formatted as a Flyer Audio/Video drive. A drive which was formatted for Audio Only would have an "A" displayed in this column, as does the drive listed on port C, "Winslow" (see fig. 3).
"Get one foot wet...."
The first thing to attend to when preparing a drive for use on the Flyer, is to make sure that the drive will transfer data just as fast as it possibly can. Note the button at the lower left of the main panel: "Cache Options". A hard drive has some control parameters which can be changed to make the drive more suitable for the specific use to which it may be put. These parameters are stored in the "Mode Pages", on an "EEPROM" chip on the drive's circuit board. An EEPROM is a chip that you can write data to, and which does not lose that data even when the power to the drive is turned off.
The items on the Mode Pages that are most important for the Flyer, are those which control the drive's "caches". These caches are RAM on the drive's circuit board where data is stored temporarily, after being read from the drive's storage platters, or before being written to the platters.
Most hard drives ship with these cache parameters set in a way that will work best for DOS applications, such as word processors or spreadsheet programs. With such applications, the user wants to make sure that data is absolutely accurate, when written or read. After all, if some of the data that make up a program get garbled, the program will not run properly. If some of the data that the user creates with a program gets garbled, then an important document or spreadsheet may be ruined.
For this reason, hard drives "double-check" data, often with several complicated routines, when transferring data in or out. They may also have different ways of setting up the cache RAM, which can affect how fast data moves in or out of the cache. As an example, the first time you ask the drive for a directory listing, it will load the list of files that it contains into the cache RAM, transfer a copy from there into your computer's main RAM, and then retain the listing in the cache RAM, in case you want it again. If you do ask for the list again, the drive can produce it for you much faster next time, since it is in the cache RAM, and does not need to be read from the drive media.
What the Flyer needs from a video drive is just for data to move as rapidly as possible, with no delays, whether writing or reading the drive. This means that all error checking should be disabled, and the drive's cache RAM configured so that all of it is made available for the data transfers, with none set aside for other purposes, and nothing ever retained in the cache RAM.
You are best off if, before you buy a drive, you make certain that the drive is a make and model that is definitely intended for video work, and already has the caches properly set for video work. This means choose your vendor carefully. Even drives intended to be video capable are often shipped from the factory set up for DOS applications instead. Good vendors have the capability and the willingness to set the drive caches up properly for you before delivery of the drive, or will be aware of those drives the Flyer "knows", and will make sure to order those for you.
If FlyerHDTools "knows" a drive, then it can properly set these cache parameters for you. If you click on the "Cache Options" button, and FlyerHDTools has information about that drive, then the Cache Options panel will open, and FlyerHDTools will select the proper cache settings file for you. In Figure 4, you can see that when I selected "Winslow" to operate on, and clicked on Cache Options, that the correct make, model, and firmware appear in the "select" text gadget below the information window which shows the list of "known drives". If you have chosen a drive forwhich FlyerHDTools already has proper setting information, all you need to do next is to click on the Set Drive Cache button.
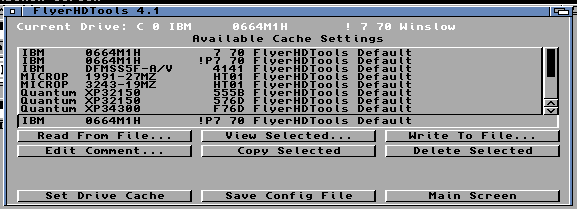
Figure 4. Cache Options panel, drive "Winslow" selected and recognized.
If, however, FlyerHDTools does not have proper cache setting information for the drive, then it will tell you, with the requestor displayed in Figure 5.
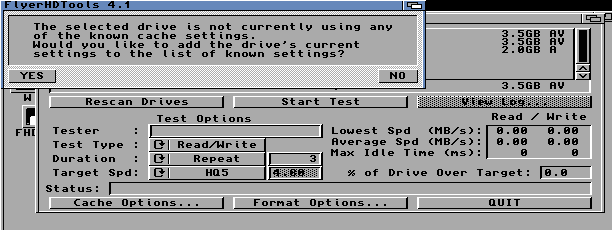
Figure 5. Cache Options Warning requester for an unrecognized drive type.
If this happens, then I would recommend that you click on the "YES" button, and go ahead and add the drive's current settings to FlyerHDTools' list of known settings. When you click "YES", you will be asked to enter a comment, and unless you know the drive is already properly set up for the Flyer (you or someone else has already customized the cache settings with a utility from the manufacturer, for instance), I would suggest you use the comment "Not Customized". If the drive has been set up for the Flyer, then use the comment, "FlyerHDTools Default". Then, on the FlyerHDTools Cache Options panel, click on the "Save Config File" button, and a new version of the file of "known drives" will be saved, which will include the new drive.
"Put your other toe in the water...."
FlyerHDTools did not know your drive. What next?
First, was the drive purchased from a Newtek vendor as a Flyer ready drive? If so, then the drive should already have the proper settings. Just save the cache settings as described above, and proceed to test and format the drive. If your test shows lower performance than you should be getting from the drive, consult your vendor.
If you did not purchase Flyer-ready, NewTek sourced drives, NewTek will not be able to assist you in making such drives workable. You may be able to work with the vendor who sold you the drives, or with the manufacturer, or with other users who have the same make model and firmware.
On the NewTek Technical Support BBS, (913-271-9299, or telnet to bbs.newtek.com) there is a directory set aside for FlyerHDTools "drive report files". Skilled end-users often upload cache setting files when they set up new drive makes and models that NewTek has not seen (for example, kudos to Kevin Elders, who has been active in configuring IBM Ultrastar drives, and posting drive report files to the BBS).
If we have worked with the drive, or a vendor or end-user has properly configured a drive for Flyer use, then the config file you need may already be present on the BBS, and all you need to do is download it, and use it.
If we do not have the drive report file you need, then you may need to consult with the vendor who sold you the drive, or perhaps even the manufacturer. Quantum and IBM both provide utilities on their BBSes which allow the user to alter the Mode Page settings, and thus correct the cache settings for Flyer use. Other manufacturers may also offer such a program. These utilities run on the PC, so you must have access to a PC with a SCSI-2 controller in order to use them. This is finicky work, however, and best left only to those technically skilled enough to do it.
Assuming that you are lucky, and the drive report file you need is on the BBS, how do you use it? On Figure 4, note the button labeled "Read From File". When you click on this button, a file requester opens (Figure 6). You can use the requester to navigate to and load the drive report file that you downloaded. Again, you will be asked to enter a comment. Do so, and proceed.

Figure 6. Cache Options panel, "Read From File" file requester.
This will create a new entry on the "Available Cache Settings" list. Locate and select that entry, and then click on the "Set Drive Cache" button. You are done with Cache settings! Return to the Main Panel.
"Get both feet wet..."
So, the caches are set. What next?
The time has come to test the drive for the level of Flyer capability that you will need. Why test? First, to see if your drive is suitable for Flyer use at all. The drive has to meet certain minimums for speed of data transfer, and for low "idle" time, in order to be useful with the Flyer. The various causes of "idle time" for a hard drive are discussed in FHDTeknotes, and I would refer those interested to that document. The requirement is that a drive have no idle times that last more than 300 milliseconds. Since there is a little "fudge-factor" in this figure as a minimum, it is even better if you can find a drive that has 200 milliseconds or less as the highest idle time.
Second, if these minimums are met, then you must test for how much of the drive is suitable for the level of recording quality you intend to use. Most Flyer users prefer to use HQ5, and if you intend to use HQ5, then you must format only that portion of the drive which can record and play video at the 4.8 MB/sec required for HQ5. This process of formatting only a portion of the drive, instead of the normal full data area, is referred to as "short-stroking" the drive.
What happens if you don't "short stroke"? The speed at which a hard drive can transfer data varies across the drive's platter. Outer tracks are longer, and store and transfer data at much higher rates than the inner tracks. As an example, a given hard drive may be able to transfer data at or above the HQ5 requirement across 80% of the surface of the platter. The inner 20% is not fast enough for HQ5.
The Flyer routinely records clips on the fastest available tracks, so clips are recorded from the outermost tracks working inward. When playing back a project, the Flyer makes temp files of little snippets of video clips, which are needed for the A/B roll effects in the project. These are always written to the innermost available tracks, and are recorded moving outward.
If you format the whole drive, then HQ5 temp files are going to get written to the very slowest tracks on the drive, and may or may not play back from there. An HQ5 clip can vary in the data rate throughout the clip, and may be as low as 1.4 MB/sec, or as high as 4.8 MB/sec. It's a crapshoot, then, whether an HQ5 clip will play back on those slow inner tracks.
In video production, you don't want a crapshoot, you want guaranteed performance. For that reason, you test the drive, and you short-stroke the drive.
First, under Test Options, click in the text gadget labeled "Tester", and enter your name. FlyerHDTools requires this. The default test settings are the ones you want to use in the first test you do on a new drive, but just in case you did a little random clicking, here is what you need:
Set the "Test Type" cycle button to "Read/Write", by clicking on the "cycle gadget". Set Duration to Repeat, and make sure that 3 is entered in the text gadget next to the button. Set "Target Speed" to HQ5.
Click on the "Start Test" button. FlyerHDTools will warn you that the test will destroy all data on the drive (Figure 7).

Figure 7. FHDT drive test "Last Chance Abort" requester.
Click on Continue, then find something else to do for a few hours. From time to time, you can check on the progress of the test by watching the blue bar grow in the Status gadget just below the Target Speed gadget. If you attempt to move the mouse while the test is in progress, you will see long delays before the pointer reacts. The test really uses a lot of system resources, and you are best off just leaving it alone while it works.
When the test is complete, a requester will appear asking if you wish to format the drive. Answer no, we'll bypass this for a moment. If you look on the right side of the panel, you will see that a summary of the test results is now showing in the two little windows (Figure 8).
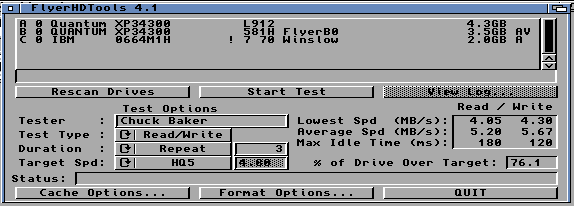
Figure 8. FlyerHDTools Main panel with results of a 3-pass test.
The upper one is a table, which displays the results of Read tests on the left, and Write tests on the left. What you are most interested in right now is the Max Idle Time figures. Neither should be above 300 milliseconds.
Check the "% of drive over target" figure. The closer to 100% the better, of course, but the exact figure you will see here will vary with make and model of drive you are using.
If you are reasonably satisfied with the results, it is time to make a choice. The FlyerHDTools.doc recommends that at this point you format the drive, short-stroked in accordance with the 3-pass test results. If you are a cautious soul, that is the course to take, and you may skip the next two paragraphs. If you are a little braver, then at this point, change the Test Duration to "Full", and hit "Start Test" again. Get the test going, and go away for a while.
When the test is complete, again check to make sure the idle times are no higher than 300 milliseconds, with under 200 milliseconds preferred. You should find that you get anywhere from 0 on up to perhaps 10% more of the drive surface over target (Figure 8b).
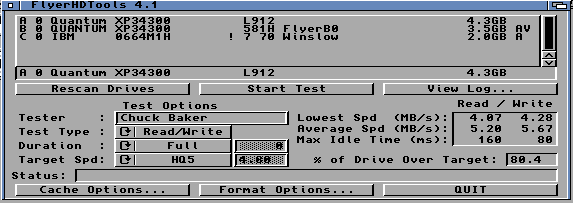
Figure 8b. FHDT Main panel will results of a "Full" (One Pass)test. Note that the drive tested about 5% higher than on the 3-pass test.
This gets you more space, and so far I haven't seen or heard of any instances where the performance is any less reliable.
"Now, dive on in!"
The moment of truth has come. Click on the Format Options button. Now you see the Format Options Panel (Figure 9).
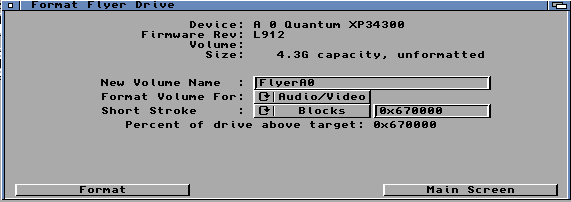
Figure 9. Format Options panel.
Note the device information is listed at the top of the panel. The "percent of drive above target" figure should also be showing below the option gadgets.
First, click into the New Volume Name gadget, and type the name that you wish to assign to the drive. This is the name that will appear under the drive's icon on Workbench.
Next, set the type of format for the drive, in the "Format Volume For:" gadget. The choices are Audio/Video, for a drive to which you wish to record video clips, and Audio Only, for an audio drive (naturally!).
Then set the short-stroke option for either Percent or Blocks (NewTek officially recommends Blocks), or for none if you do not wish to short stroke.
When you are satisfied with your entries, click on the "Format" button. A requester will appear, offering the option to abort, if you wish, or to continue (Figure 10).

Figure 10. Format "Last Chance Abort" requester.
If you continue, then a few minutes later the drive will be freshly formatted, and ready for recording.
"Remember to come up for air now and then."
Now that you are familiar with the process, you can apply the same principles to testing and configuring an Audio drive. One of the selections for Target Speed is Audio, and testing a potential audio drive at Repeat 3 with this option is wise. It is virtually never necessary to short-stroke an audio drive.
The principle factor you are looking for when testing an audio drive is a short idle time, no more than 200 milliseconds. An audio drive also should have a fast "seek time" (also called "access time", this refers to the average time a drive takes to locate a particular track), something you should look for in the specifications when selecting a drive to purchase. Both of these characteristics are needed if the drive is to be able to deliver two streams of stereo audio during project playback.
If you seem to be having problems with a drive after it has been in operation for a while, it is a good idea to test and reformat the drive. If the drive tests well, with results the same as it originally had, then the problem may simply have been due to corruption of the data or file structure on the drive. If the drive shows higher idle times than it used to, or a severely reduced area capable of the expected performance, then the drive may be failing, and you should see about diagnosis and repair.
This by no means covers FlyerHDTools exhaustively, but you should now have a command of the features and the steps that are actually necessary to set up your video and audio drives.
Video Toaster FAQs
Flyer FAQs
MAIN INDEX


