

 http://www.netrover.com/~timt/cheats/b/bardstalei.html (Amiga Plus Extra No. 5/97, 05/1997)
Obviously, the first thing you must do is assemble your party. There is a BEGINNING party (supplied with the game) already equipped with a basic level of Armour, Instruments, etc. A much better and unique option is to transfer characters over from either WIZARDRY or ULTIMA III! These characters come over as fairly senior level characters and make the beginning of this game much easier. This is a highly desirable alternative.
If you create your own characters - which you MUST do for your Bard - pay special attention to the DEXTERITY attribute. This attribute determines who strikes first in combat, and can be the difference between an easy encounter and one which is a struggle.
Magic users should have a HIGH IQ, while Fighter classes should have a HIGH STRENGTH. It is recommended that you choose a Monk as one of your Fighters. Their Armour class drops as their level rises. Eventually the Monk will have an Armour class of 'LO' wearing only a robe. They can also do the most damage unarmed in actual combat!
These monsters are listed from strongest to weakest. Only their names are given.
001 Ancient Enemy - | 037 Demon --------- | 073 Lurker
002 Balrog -------- | 038 Banderswitch -- | 074 Fire Giant
003 Lich ---------- | 039 Maze Dweller -- | 075 CopperGiant
004 Archmage ------ | 040 Manger -------- | 076 Samurai
005 Demonlord ----- | 041 Mandar Guard -- | 077 Black Widow
006 Oldman -------- | 042 Gimp ---------- | 078 Assassin
007 Master Magician | 043 Red Dragon ---- | 079 Werewolf
008 Master Sorcerer | 044 Titan --------- | 080 Ogre
009 Master Conjurer | 045 Shadow -------- | 081 Wright
010 Master Wizard - | 046 Berserker ----- | 082 Statue
011 Mindshadow ---- | 047 Conjurer ------ | 083 Bladesman
012 Spectre ------- | 048 Magician ------ | 084 Goblin Lord
013 Cloud Giant --- | 049 Wizard -------- | 085 MasterThief
014 Greater Demon - | 050 Sorcerer ------ | 086 Ninja
015 Mad God ------- | 051 White Dragon -- | 087 Spinner
016 Beholder ------ | 052 Ice Giant ----- | 088 ScarletMonk
017 Vampire Lord -- | 053 Eye Spy ------- | 089 DopplerGanger
018 Maze Master --- | 054 Ogre Lord ----- | 090 Stone Giant
019 Death Denzien - | 055 Mad dog ------- | 091 Spider
020 Jaber --------- | 056 Wolf ---------- | 092 Thief
021 Black Dragon -- | 057 Phantom ------- | 093 Gnome
022 Mangar -------- | 058 Lesser Demon -- | 094 Dwarf
023 Crystal Golem - | 059 Fred ---------- | 095 Thief
024 Soulsucker ---- | 060 Ogre Magi ----- | 096 Hobgoblin
025 Storm Giant --- | 061 JackelWare ---- | 097 Skeleton
026 Master Ninja -- | 062 Stone Elemental | 098 Nomad
027 War Giant ----- | 063 Blue Dragon --- | 099 Spider
028 Elite --------- | 064 Seeker -------- | 100 Mad Dog
029 Bonecrusher --- | 065 Dwarf King ---- | 101 Barbarian
030 Ghost --------- | 066 Samurai Warrior | 102 Mercenaries
031 Grey Dragon --- | 067 Ghoul --------- | 103 Wolf
032 Basilisk ------ | 068 Azure Monk ---- | 104 Jade Wolf
033 Evil Eye ------ | 069 Weretiger ----- | 105 Half Orc
034 Mimic --------- | 070 Hydra --------- | 106 Swordsman
035 Golem --------- | 071 Green Dragon -- | 107 Zombie
036 Vampire ------- | 072 Wraith
To get more gold than you will ever need (and then some), transfer all the parties gold to one player. Save him to disk then load him back up and transfer all to another. Keep repeating this process till you have done it to all the players, then exit without saving. Load back up and all your players will have the amount of gold equal to that of the entire party before. Reapeat until satisfied.
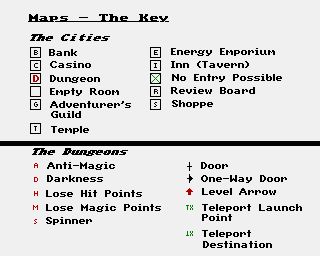


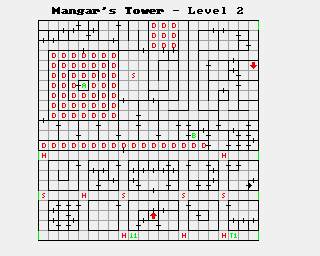


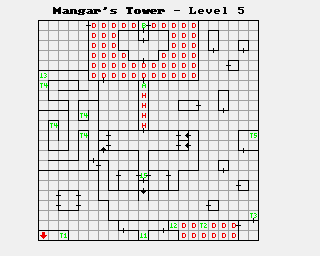


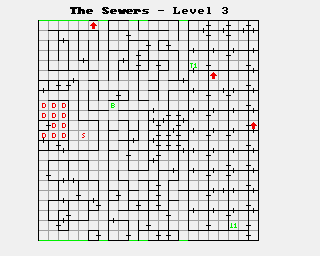
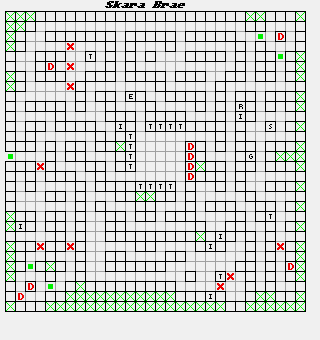

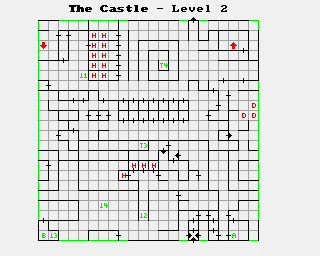

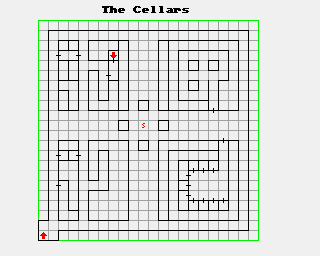
The starting party in this solution consisted of a Monk, 2 Paladins, a Bard, a Magician and a Conjuror. At higher levels of the game, you will want to trade in one of your Paladins and develop another MAGIC user.
When you first leave the Adventurer's Guild, explore the City. Visit Garth's Armoury, and find the Review Board (located next to the Inn on Trumpet Street). Don't wander too far until you get a feel for how you can survive. To restore HIT POINTS after fighting, visit a Temple. There, all ills - including death - can be cured for a price. After a fight, you will quite frequently find objects of some type. Keep them all. If you don't need them, go to Garth's and sell them for gold - you will need it!
Visit Roscoe's Energy Emporium located off the Gran Plaz on the corner of Grey Knife Street. There you will get an idea of what it costs to RESTORE SPELL POINTS.
Early on, when you are still short of gold, the best way to restor. Spell Points is to go into the Adventurer's Guild and just wait. This game is in real-time and Spell Points are restored as you just sit there. If you wait on the street or in a house, you will almost certainly be attacked.
When you find an object after a fight or in a Chest in the Dungeons, experiment with it to find out what it is. There are no cursed items. Quite a few objects have magical properties that are not readily apparent. Here are a few of the objects that you will find most useful, even though you won't run into these until later in the game:
It is left to the individual player to discover the usefulness of the other items found during the game. After learning the game-play by wandering around the City and being able to survive, it is time to visit the Dungeons. This is where the battle with Mangar will be won or lost!
There are FIVE Dungeons in the game that must be explored in the following order:
Each contains something that will help in the subsequent stages of the game.
The easiest dungeon of them all is reached from the Inn on Rakhir Street. Enter the Inn, ask to order a drink, then select WINE. You will then be ushered into the Wine Cellar. I cannot overstress the importance of MAPPING in this game. Whenever possible, have the MALE SPELL in operation. This will help you avoid some of the traps that are lying around. When you have an encounter and find a Chest, always cast a TRZP SPELL to disarm any traps that may be guarding the Chest.
Located in the Wine Cellar are the stairs down to the SEWERS. The First Level of the Sewers contains almost nothing of interest. So locate the stairs to the Second Level of the Sewers as quickly as possible and get down there. The Second Level contains one very important bit of information that you will need to enter The Catacombs: the name of the Mad God. There are also two hints to questions that will be asked in other Dungeons. Explore this level fully to find all the hints and the Mad God's name. The Lowest Level of the Sewers is next and contains one item of importance for later in the game. Locate and take the stairs exiting from this level. Make sure you know where the stairs lead EXACTLY. After this (I hope you have been visiting the Review Board regularly to advance levels and learn new spells), you are ready for the Catacombs.
The Catacombs are reached from one of the Mad God's Temples, located on the East side of the Temple. Ask to speak to the Priest, then give him the Mad God's name: TARJAN.
The First Level of the catacombs is just a survival test at this stage. Once you can survive there fairly easily, head for the Second Level. This level has a clue in it about the Mad God. It also contains a very nasty creature called a Soul Sucker that lurks in the Southwest corner of the Second Level. If you decide to go in there and try him out, make sure that you have your character disk backed up. You will not be able to defeat him at this stage of your development but, fortunately, you don't have to!
The lowest Level contains something you will need later. Once you have reached the Third Level you must use a TELEPORT SQUARE to enter the Wizard's Realm. The Teleport is located in the SOUTHEAST CORNER of the Dungeon. Once you are in the Wizard's Realm, you must defeat him to gain the EYE. After you have this item, you are ready to tackle Harkyn's Castle.
Harkyn's Castle is located in the NORTHEAST CORNER of SKARA BRAE. At this point in the game, it becomes very important for you to have filled your special slot with the most powerful character your magic users can summon. If you are in the process of developing a Wizard, a lesser demon is best.
The First Level of this castle contains one item of importance: THE CRYSTAL SWORD from the SOUTHEAST corner of this level. You will now begin to find some of the more powerful objects to experiment with during your encounters. After obtaining the CRYSTAL SWORD, head for the Second Level of the Castle. The stairs are located in the NORTHEAST corner of the First Level.
The Second Level of the Castle has a couple of interesting things. If you answer the riddle correctly ("SHIELDS") you get a MAGIC MOUTH which can be used to cast the SOSI SPELL. You must also obtain the SILVER SQUARE from the SOUTHWEST corner of the Dungeon. The access to this is from a TELEPORT located towards the middle of the Northern section of the Dungeon. The PORTAL to the Third Level is located in the NORTHEAST section of this level.
The Third Level of the Castle contains the ENTRANCE to KYLEARAN'S TOWER and some interesting opportunities. The answer to the Old Man's question is "SKULL TAVERN". When you encounter the Berserkers, located at 12E 5N of this level, take advantage. They can be fairly easily defeated with the right magic spells. You should have at least 2 Sorcerers capable of casting the MIBL SPELL. It also helps if your Bard has a FROST or FIRE HORN to aid the others along.
When you can defeat these guys easily, it is time to make another Magic User. You can TELEPORT from the CASTLE ENTRANCE, fight the Berserkers, TELEPORT back back to the Entrance, exit the Castle, then do it again and again until your spells run low. At 60,000 Experience Points a crack, it doesn't take long to develop a decent Magic User.
After this, it is time to attempt Kylearan's Castle. When you approach, and fight the STATUE OF THE MAD GOD located in the SOUTHEAST corner of this level, you will be teleported inside the gates of Kylearan's Tower.
After the battle with the Mad God and your subsequent teleport (you DID have the EYE in your possession?!), go ONE STEP forward, TURN RIGHT, then kick the door down. You will then be entering one of the two most difficult mazes in the game. Most of it is in the dark and there are riddles that must be answered. Back up your character disk BEFORE entering this maze!
Once you are in, watch carefully for teleports - they are everywhere. It is extremely important that you map this maze VERY CAREFULLY. After you have reached the ANTIMAGIC SQUARE from wandering in a very small section of the dark, the next step forward is a TELEPORT to 11E 12N.
Explore until you find a MAGIC MOUTH that asks you to "Name the one of cold, foretold twofold". The answer to this one is "STONE GOLEM". You will then be teleported again. After this, you will enter a very large, dark area. In order to get out of this, you must answer the question posed at 12E 2N which says: "Name the Endless Byway and your path will be guaranteed". The answer to this is the only street in Skara Brae with no end - "SINISTER".
You can then map your way through a lighted section to another dark area. From this dark area you must obtain the SILVER TRIANGLE, located at the very NORTH of the dark area. You can then exit the dark area, going SOUTH from 1E 6N. After this, you will face the CRYSTAL GOLEM (did you bring the CRYSTAL SWORD?). You can defeat him with conventional weapons and spells, but somebody has to have the Crystal Sword or he will reappear to block your exit!
At this point, you can exit the Tower to refresh your players or continue on. If you exit, when you re-enter you must again answer the endless byway question to continue. Upon reaching the end of the Snakey Road on the East side of the maze, DON'T go through the South door. Take the door that goes WEST. You will then enter several rooms with Spinners and Teleports that make finding your way almost impossible!
The way past these is SOUTHWEST. When you make it, you will be teleported to 14E 1N. It is then an easy stroll to meet Kylearan himself. He turns out to be the friendly Wizard and gives you a KEY that allows you to get into MANGAR'S TOWER. He then teleports you to the stairs exiting his tower. You no longer need the Crystal Sword or the Eye, and you are now ready for Mangar himself!!
If you paid heed and followed the stairs from the Bottom Level of the Sewers, you will know how to get inside Mangar's walls. If not, go to the Wine Cellar, TELEPORT your party 17E 16N 3D, and take the stairs UP. Then TURN RIGHT and kick the door in. You should be at the Entrance to Mangar's Tower.
Level One is fairly easy to find your way around in. Follow the teleports and walk around until you reach the MAGIC MOUTH on the EAST side of the maze. What is tricky is that after leaving the MAGIC MOUTH, you are now on Level Two of the Tower.......so BE CAREFUL with your mapping!
Level Two is again fairly easy. From this level you must answer the question located at 4E 15N to obtain the SILVER CIRCLE. The answer to the question is "CIRCLE". You must then make your way to the stairs located in the MIDDLE of the SOUTHERN side of the maze.
Level Three is the hardest maze of all, but by this time you must be getting really proficient at mapping. You must wander around this level and obtain quite a number of items. First of all, you should get the MASTER KEY, for 50,000 Gold Pieces, from 19E 12N. This Key allows you to enter Mangar's through the Front Gate, instead of from the Sewers.
You must then find the CLUES to the SEVEN WORDS needed to access the Fourth Level of Mangar's. Gratefully, you can teleport into and out of this level. After finding the CLUES, you can then SPEAK the SEVEN WORDS to the MAGIC MOUTH located at 10E 4N. They MUST be entered ONE AT A TIME. The words are: "LIE WITH PASSION AND BE FOREVER DAMNED". Stairs will then appear at 3E 9N. This is the ONLY way to obtain access to the UPPER REACHES of MANGAR'S!!
The Fourth Level of Mangar's has only ONE tricky part. When you first arrive, you have a LIMITED NUMBER of ways you can go. After reaching a certain point, located in the NORTHEAST CORNER of the level, doors appear everywhere. Don't be confused! Everything maps the same, it's just that doors are everywhere!! Eventually, you will find the PORTAL to Level Five in the SOUTHWEST corner of this level.
Level Five is the home stretch. This easy maze leads you to the LAVA PIT in the middle of the EASTERN side of the maze. There you DIVE IN and are TELEPORTED to 10E 6N. You will then find the march up the Hall of Harm to be fruitless if you didn't bring the THREE SILVER ITEMS along. If you have the SILVER TRIANGLE, SILVER SQUARE and SILVER CIRCLE, a door will appear directly NORTH of you.
After passing through this door, cast your REST SPELL to restore everybody to HEALTH and proceed directly NORTH to the final battle with Mangar!
The final battle itself is a large disappointment as it is fairly easy to defeat Mangar and his Vampires, and meet Kylearan again, who gives you 300,000 bonus Experience Points. After defeating Mangar, you can then proceed ONE MORE SQUARE NORTH for the LAST QUESTION of the game!
The answer is: "SPECTRE SNARE", which you then receive (it is good for binding to your party any of your opponents in battle).